by Carina’s Craft Blog

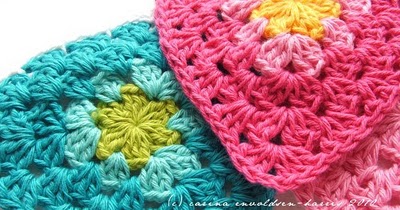
See below How-To make these triangles. Let's put some triangles together! It's easy! Grab your triangles and sort them so they look all pretty like.

Click on the image to see it really quite a bit larger.
1: Make a chain that is approximately 25cm / 10" long, join with slip stitch into one corner of a triangle
2: Then chain 4, slip stitch into the space between the two groups of 3dc, chain 4, slip stitch into the space, continue in this manner until you get to the corner.
3: Slip stitch in the corner too, then chain 10 (or there abouts).
4: Then join with the next triangle and repeat.
Repeat for every triangle (you saw that one coming, right?!) After you have added your last triangle, finish off the the bunting with another chain like at the beginning.
It should look something like this.

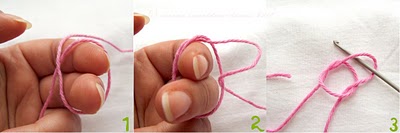
Crochet magic ring tutorial
And despite its name, there is actually no magic involved whatsoever. I am sorry to disappoint you!
Click on the images to view them larger.
Ok, grab your yarn and we'll do this!
1: wind yarn around your fingers like you are going to make a slip knot. Make sure that you have a few inches of yarn hanging from your fingers - the end that isn't attached to your ball of yarn
2: pull a loop of yarn through the yarn on your fingers. The yarn you pull through must be the end still attached to your ball of yarn
3: remove the yarn from your fingers and insert your hook in the loop

4: yarn over and pull through
5: with the loop still on the hook, insert the hook in the ring itself, yarn over, then pull through the ring
6: you should now have two loops on your hook

7: pull the latest loop through the other one, so you only have one loop on the hook
8: now chain 3, this will count as the first dc
If you are working on a project that has sc or tdc in the first round, adjust the length of your chain accordingly.
You now have your magic ring ready to go. There should be a bit of yarn hanging from the ring. Do not pull this until you have worked the first round of your project. Unless your ring is very loose, in that case, do tighten it a bit so it is easier to work with.
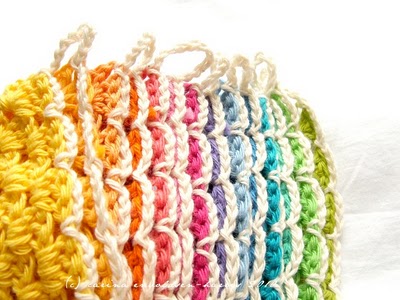
Tutorial: crochet granny triangle
So! Here we go with the granny triangle* tutorial. Did you master the magic circle yet? Ready to go?If you don't fancy using the magic circle, you can make a ring by making 4 chain stitches and joining them into a ring.
Please note, I am using the American crochet terms in this tutorial.
*Sorry, if you've ended up here searching for a different kind of granny triangle. I assure you I can't help you with that. Why not take up crochet instead..
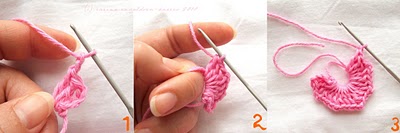
Round 1
Img. 1: Ch3 in the magic circle, counts as first dc, 2dc into circle, ch2, 3dc, ch1, 3dc, ch2, 3dc, ch1, 3dc, ch2, 3dc, ch1, join into top of chain
Img. 2: notice how I am holding the ring? It actually makes it easier to hold onto the work at this stage
Img. 3: When you get to the end of the round you should pull tight the magic ring if you are using it. But don't cut off the 'tail' - you may need it later

Img. 4: See how that's all neat and tight?
Img. 5: Once you have joined the round, slip stitch through the stitches between the join and the first ch2 space, make sure to crochet into both the front and back of the stitches
Img. 6: when you get to the ch2 space, make a slip stitch around the chain
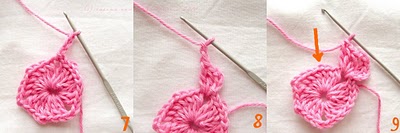
Round 2
Img. 7: chain 3, counts as first dc
Img. 8: 2dc in the corner/ch space, ch2, then 3dc in the corner
Img. 9: find the ch1 space from the last round - sometimes a bit tricky to find..

Img. 10: 3dc into the ch1 space, then repeat the following sequence twice: 3dc in corner, ch2, 3dc in corner, 3dc in ch1 space.
Img. 11: if you got the sequence right, you should now be at the end of the round, join with ch3 and then slip stitch through the stitches to the corner
Round 3
Img. 12: chain 3, counts as first dc, 2dc in the corner/ch space, ch2, then 3dc in the corner
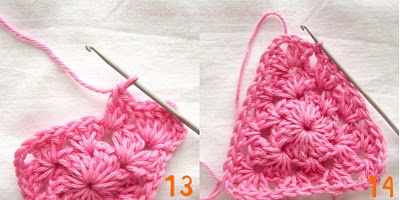
Img. 13: 3dc the space between two 3dc groups from the last round, then 3dc in the next space. Then repeat the following sequence twice: 3dc in corner, ch2, 3dc in corner, 3dc in space, 3dc in space.
Img. 14: join with ch3 and that's your triangle!
You can of course add more rounds if you want a larger triangle! As you're working, the centre of your triangle may start becoming a bit loose, but that's ok, just use that 'tail' to pull the magic ring tight again.
No comments:
Post a Comment